
Thread Repair with HeliCoil Inserts
Sep 18, 2026
Section A: Introduction to HeliCoil Installation Tools
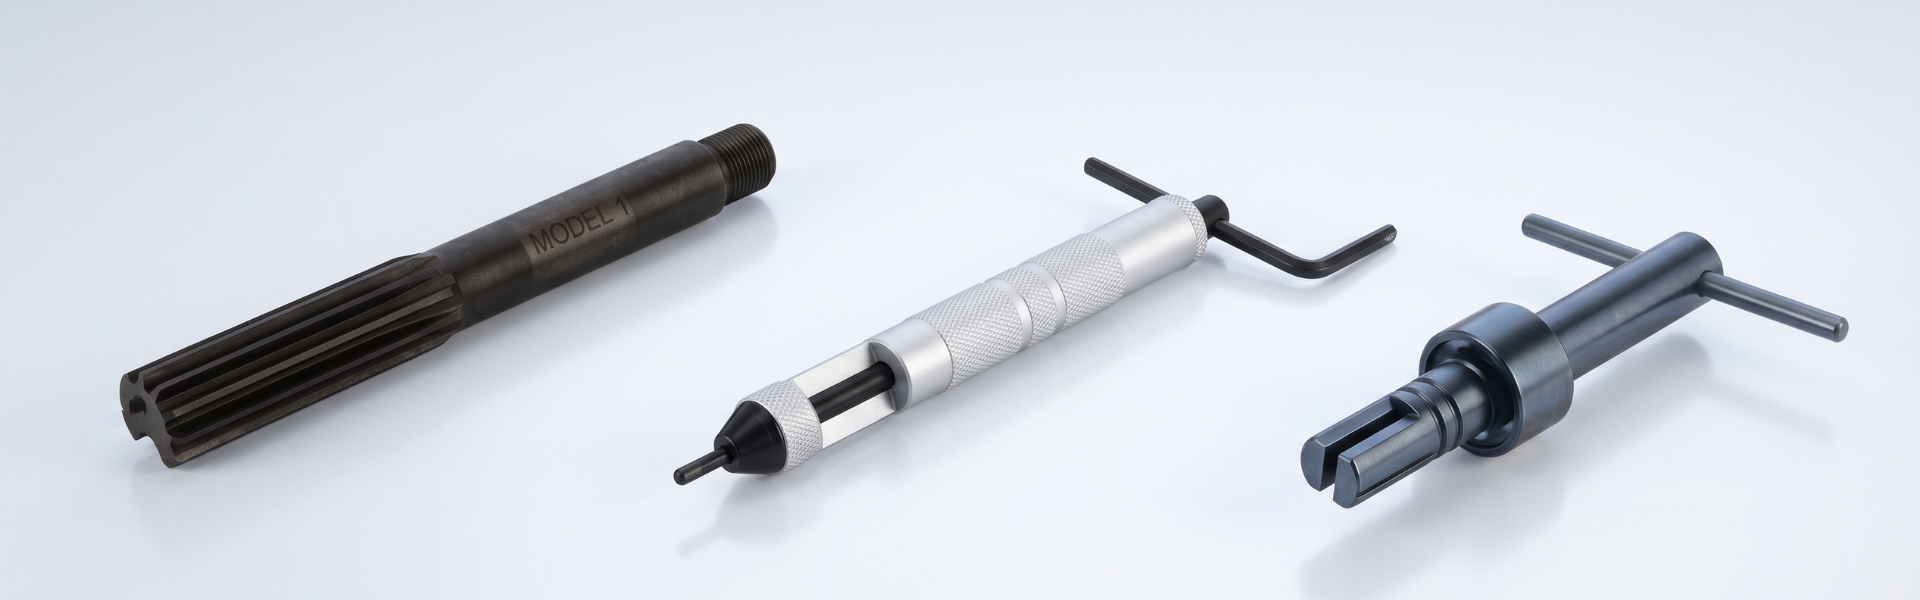
Depending on factors such as speed and volume, or constraints in HeliCoil inserts to be installed, different inserting tools are available. These tools differ significantly in design and dimensions. Careful consideration must be given in choosing the right type.
Ultimately, the choice of installation tool must give the user comfort, reliability and durability in carrying out the installation process.
Before moving on to the different configurations, it must be stressed that no one tool is better than another. Everything comes down to the working environment and user preference.
Like cutting taps, every size will require its own installation tool. This principle applies even for inserts with the same diameter but different pitch. Without following this rule, inserts may get jammed, while inserting tools may get damaged.
Section B: Types of configurations
HeliCoil installation tools are classified into three self-explanatory categories. They are: manual, electrical and pneumatic.
In this manual, we will look at manual installation tools, which can take on three different configurations for each size*. These are three broad-based configurations and are mentioned here for their wide acceptance and usage. They are Mandrel type, Prewinder type and Fly-over tools, and listed below, together with a brief description.
*It is worth noting that HeliCoil is manufactured in different countries, and that each manufacturer can produce their own interpretation of each tool. The design therefore, varies from one another.
For example, while two manufacturers can produce a HeliCoil mandrel, the handle or length of the tool may differ. It is highly recommended that you check with the distributor, and match the part number with the tool offered before purchasing your tool.
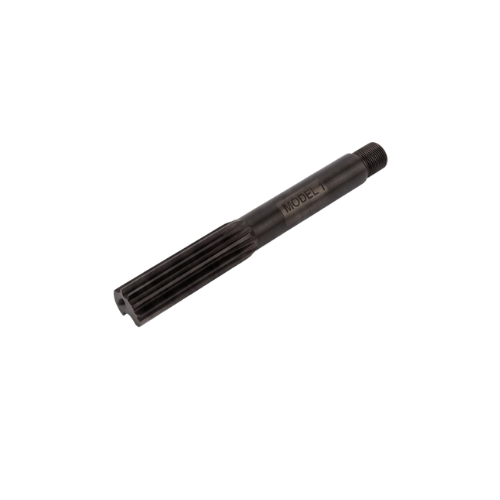 |
Mandrel Type
Mandrel type installation tools are the most basic and economical form, and are always packaged inside thread repair kits. Being threaded, they prevent cross-threading and suit work pieces with space constraints. |
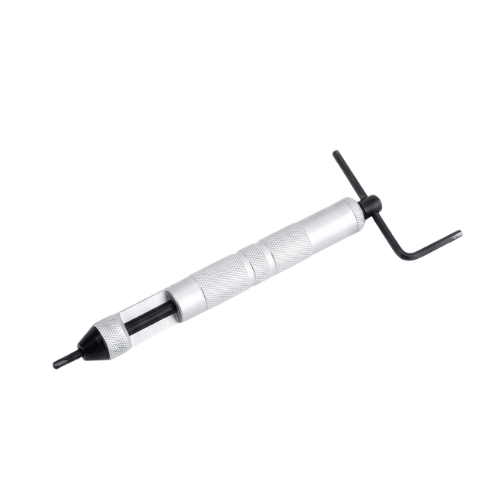 |
Prewinder Type
Prewinder tools work by compressing the outer diameters (OD) of Helicoil inserts before they enter the threaded hole. Further equipped with a ‘T-handle’ behind, they promote a smooth and efficient installation process. Highly recommended for fine-pitch inserts. |
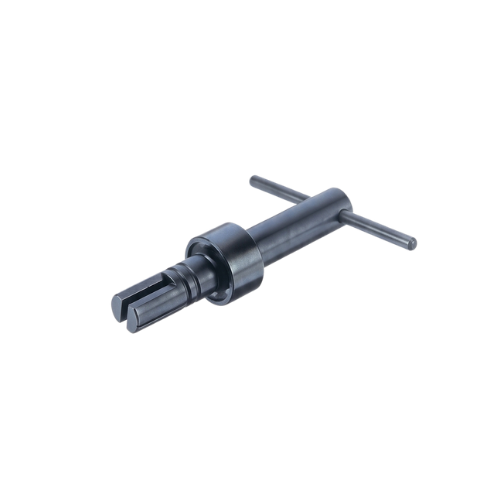 |
Fly-over Type
Fly-over tools are generally available only for sizes M16 (or 5/8”) inserts and larger. The slotted drive together with the ‘T’ bar behind provides an extremely strong grip for easy installation. Fly-over tools are generally used for metric coarse inserts and not recommended for fine-pitch inserts. |
Section C: Installation Process with HeliCoil mandrels
In this section, we will show the correct installation process for each type of installation tool. All the threaded holes shown have been tapped with a HeliCoil tap and are ready for insert installation.
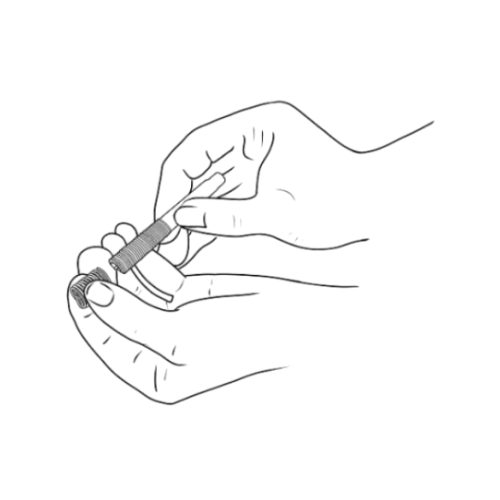 |
Loading
Using your hands, load the insert onto the mandrel by screwing it in. At the point where the insert cannot be turned anymore, the notch should meet the drive of the mandrel. |
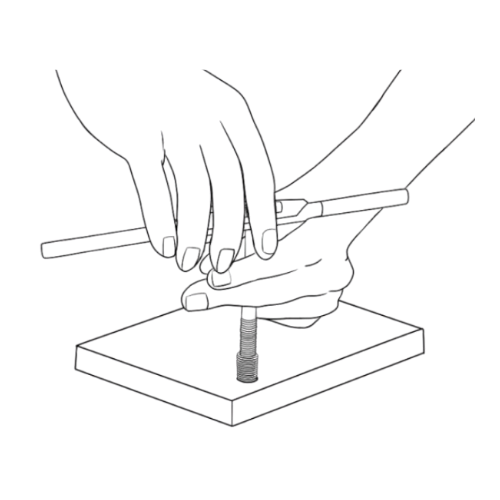 |
Aligning
For ease of installation, do use a tap wrench. Try and align the mandrel such that it is perpendicular to the work piece. |
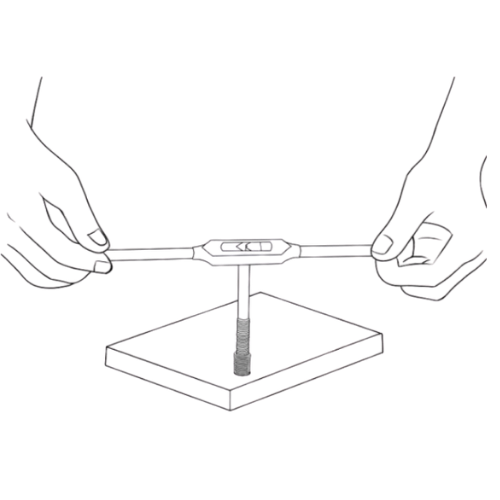 |
Driving
Wind the helical insert in using the mandrel with light downward pressure until the insert is 1/2 to 1 coil below the surface, driving the tang towards the bottom of the hole. |
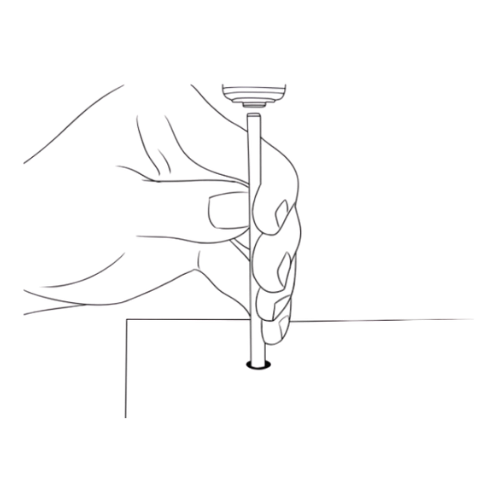 |
Breaking the tang
Finish the installation process by breaking off the tang with a tang break-off tool that is of the correct diameter. |
Section D: Installation Process with HeliCoil Prewinder Tools
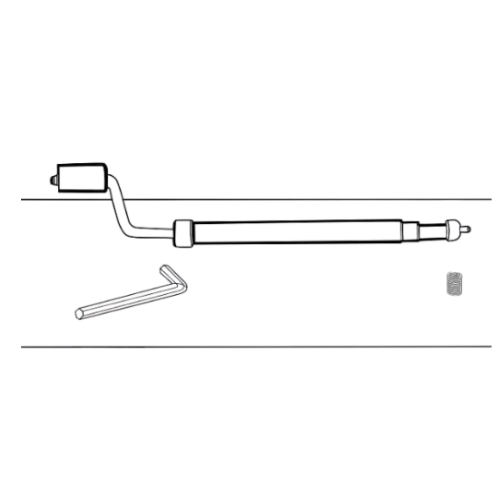 |
Preparation
Prewinder tools are generally used for high-volume installation. It is recommended that the tool is set up correctly so as to maximize efficiency during installation. Have an Allen key ready before using the Prewinder tool. |
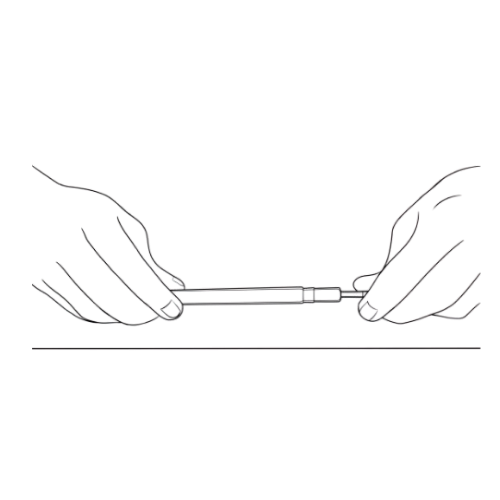 |
Determination of insert depth
Take the insert and turn it into the mandrel all the way until the tang is engaged onto the catch. Leave a space allowance of 1 to 2 threads between the Prewinder and the last coil of the insert. This will determine how deep the insert will sit inside the threaded hole. |
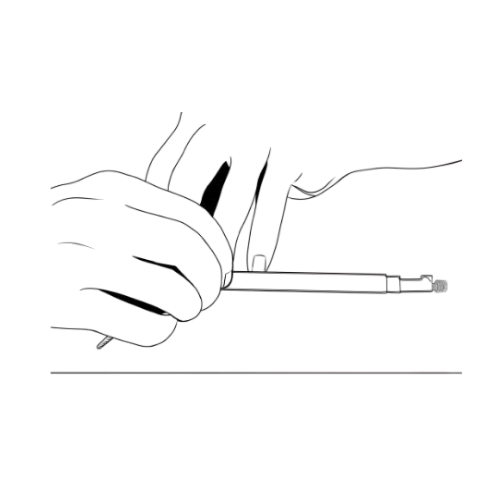 |
Locking of stopper
Once you are happy with how deep the insert should sit, lock the stopper near the back of the mandrel with an Allen Key. Once this is fixed, you will no longer need to check repeatedly if the insert has entered the threaded hole fully, and if it is deep enough. |
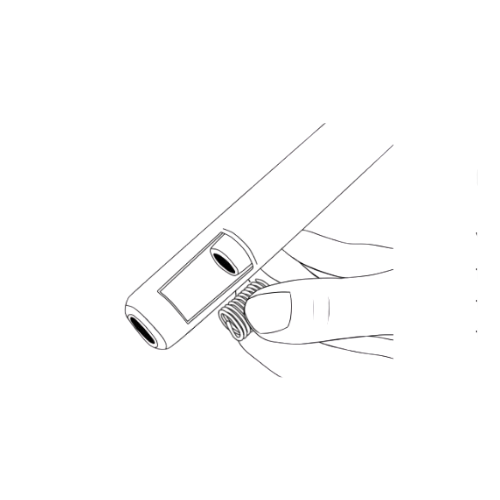 |
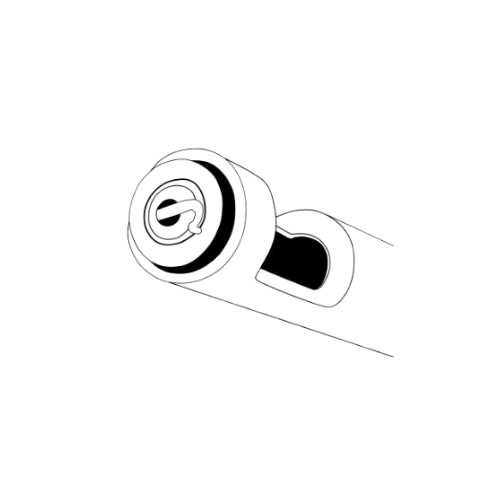
Loading the insert
You can now load the insert for installation. With the tang facing outwards, leave the insert inside the chamber and turn the mandrel to engage the tang. While turning, each turn should be relatively easy without too much friction. |
 |
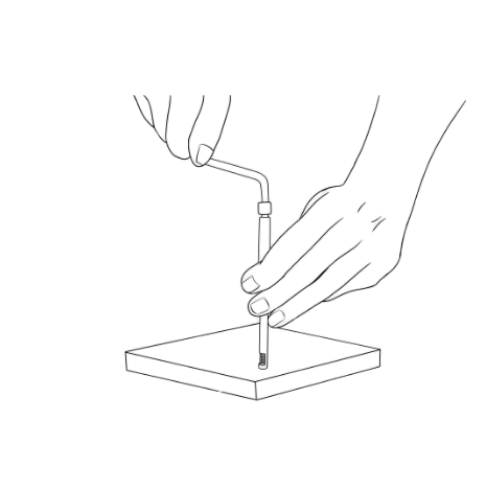
Ready for installation
Turn the insert right until the tang is protruding slightly from the Prewinder. This lets you know that the tool can now be placed on top of the work piece for insert installation. |
 |
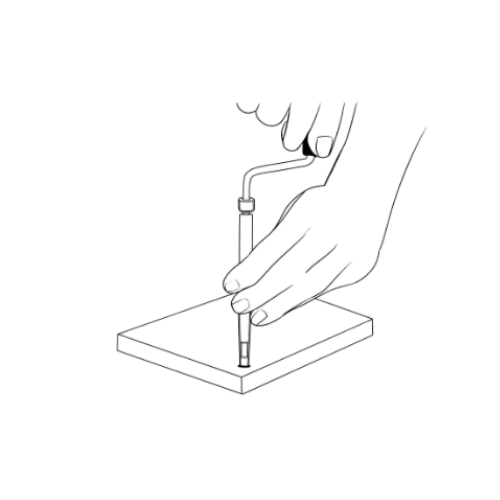
Installation
Using one hand to turn the handle behind, and another to grip the Prewinder, make sure that the tool is perpendicular to the work piece. When turning, only the mandrel should be doing the work, while the Prewinder is secure and stationery. |
 |
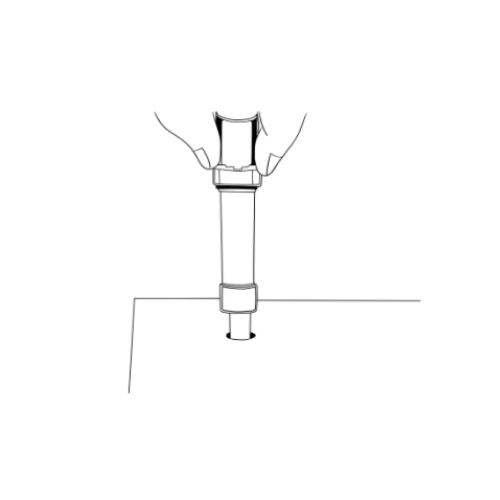
Removal of Installation Tool
Depending on the type of mandrel, slotted head mandrels should be removed by pulling the tool vertically upwards. For threaded mandrels, turn the tool anti-clockwise. |
 |
Breaking the tang
Once the insert installation is correct, break the tang using an automatic tang break-off tool. |
Section E: Installation Process with HeliCoil Fly-over Tools
HeliCoil Fly-over Tools are generally used for inserts that are bigger in size, and can only be used for coarse thread inserts. For fine-pitch inserts, it is highly recommended to use Prewinder tools.
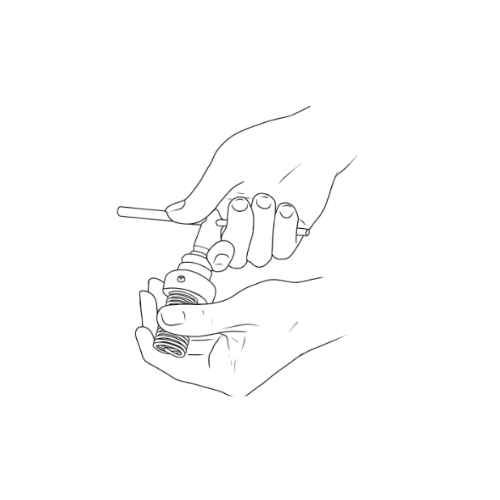 |
Loading
Similarly to the Prewinder tool, the Fly-over Tool comes with a depth stopper. Use an Allen key to adjust the stopper to the correct length. Let the open slot of the tool engage the tang. |
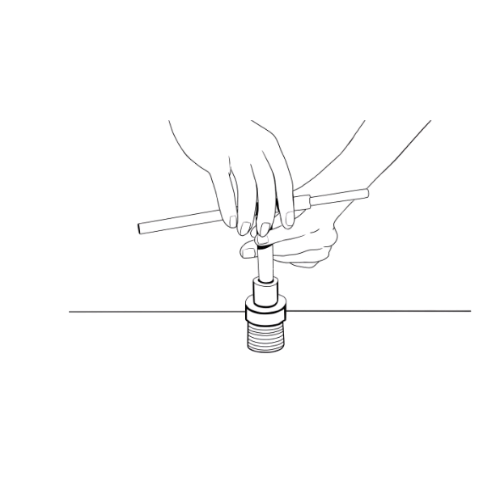 |
Installation
Using the stopper, hold the insert in place and turn in a clockwise direction. The insert should enter freely. |
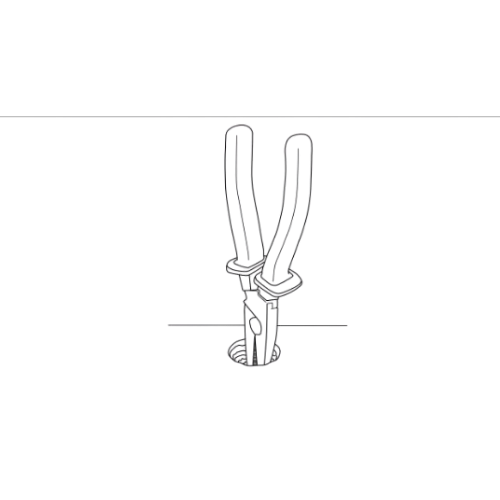 |
Breaking the tang
Once the installation is complete, break the tang using a long-nose plier. |
Troubleshooting
In the course of using HeliCoil inserts, there are some important points we need to take note of to ensure smooth installation. Below, we list some common mistakes that occur and the steps to take in order to prevent them.
- When tapping, the tap breaks.
Corrective action: Check that the hole is drilled to the correct diameter. Do not use drill bits that are worn as they may be undersized*. Also, always use tapping oil or lubricant when tapping.
*Just because a drill or tap is printed with a certain size, does not mean that the size will always be what is indicated (unless they are new). It is always critical to verify used drill bits and taps. For a rough reference, drill bits and taps will always wear considerably after usage for approximately 200 holes.
- While installing, the insert is not able to enter the threaded hole.
Corrective action: Make sure that the hole is drilled and tapped to the correct diameter* and tolerance. Use a STI (screw thread insert) gauge if possible. When installing, make sure the insert is held in place by the collar and sits vertically on the hole before turning in.
For screw-lock inserts, it is important to use prewinder-type tools, as the hexagon coil needs to be compressed before it can enter the tapped hole.
*Interchangeability is important. Make sure the brand of inserts used corresponds to the tap. Generic taps made by tap manufacturers who do not produce HeliCoil inserts may not match.
- After installation, the coil does not sit properly on the tapped hole, and one (or more) of the threads “jumps”. As a result, the screw may not be fastened into the threaded hole.
Corrective action: Check that the hole is tapped properly, and that while installing, do not press down on the inserting tool. Use horizontal action to install the helical insert. For a more secure and smooth installation, use prewinder-type installation tools.
- When breaking the tang off, it does not break fully, but is bent at an angle.
Corrective action: Check to make sure that the hole is deep enough for the tang to be completely broken off (there should enough space for the tang to bend 90⁰).
- After the tang is broken off, the screw cannot be fastened beyond the last thread. That is, when it reaches the bottom thread, it gets stuck.
Corrective action: Check that the last thread did not “jump”, as it could have been pulled downwards when the tang was broken off. Always use enough, but not too much force when breaking the tang off. Use an automatic spring-loaded tang break-off tool if possible.
Frequently Asked Questions (FAQ)
- The insert, in its free state, does not fit ‘snuggly’ into the screw, but is bigger than the screw. Is this normal?
Answer: Yes, this is normal. The HeliCoil insert in its free state is always ‘oversized’, compared to the threaded hole. This is so that after installation, the insert is able to exert radial pressure and lodge itself against the work piece.
- A certain thread insert has a nominal length of 10 mm as stated in the specifications table. However, when I measured the actual insert, it only shows 7 to 8 mm. At other times, it may even show only 5 to 6 mm. Is this correct?
Answer: Yes, this is normal. Due to wire tension, a thread insert may be more ‘compressed’ (where the coils stay close together) or ‘open’ (the coils stay further apart from each other). They should not be measured in their free state, and will reach their stated nominal lengths after they have been installed, as they will then follow the tapped thread dimensions.
- After the insert is installed, I checked the hole using a standard thread plug gauge. However, the No-Go side enters freely while sometimes, the Go side does not enter at all. Is this normal?
Answer: Yes, this is normal. Because the HeliCoil insert is made with a rhombus cross-section, this may differ from the angle of the standard gauge. Therefore, it is not necessary, and in fact, wrong to check the hole with a helical insert with a standard gauge. For checking, use a STI gauge before installing the threaded insert.
- What length of insert should I use?
To determine which length to use, it is important to refer to the drilling and tapping depths chart (typically denoted by our symbols “Q”, “R”, “S” and “T”). They will tell you the effective thread engagement for every insert length.
- What are Screw Lock inserts?
In addition to all the characteristics of the Free Running insert, Screw Lock inserts have one or more of its intermediate coils deformed polygonally. This serves to create strong resilient pressure onto the thread flanks of the bolt as it passes through.
- What is the purpose of Screw Lock inserts?
The built-in Prevailing Torque of the grip coil positively locks the bolt, safeguarding against loosening under vibration or impact.
- Why does my screw not enter freely into a hole that has a screw lock insert installed?
This is because our fingers do not provide sufficient force in fastening the screw. For correct installation, the initial threads can be fastened by hand. When the screw reaches the grip coil, you must use a driver (whether it be an Allen key or Philips screwdriver, depending on your screw) to fasten further.
- Why are there so many types of HeliCoil inserts?
Technically, HeliCoil is a brand, so there is only one type of HeliCoil Insert. There are many types of screw thread inserts in the market, but they are known by different brand names.
- Why is HeliCoil available from different manufacturers?
Originally, HeliCoil was invented and produced by Emhart Teknologies (known today as Stanley Engineered Fastening) from the USA in 1938. Till today, they are the only company in the USA to produce HeliCoil inserts.
Outside of USA, Bollhoff GmbH from Germany and Bollhoff Armstrong Ltd from the United Kingdom are the only companies licensed to produce HeliCoil inserts and tools.
- Are all these HeliCoil inserts the same?
As long as an insert is produced from any of these companies, they conform to the same stringent and quality-assured standards. Unless special manufacturing instructions are given, their dimensions are all the same.
- HeliCoil inserts produced from all 3 companies carry different part numbers. Why is this so?
As every company has its own accounting system, their references to HeliCoil inserts and tools also change. However, official letters and Certificates of Conformity (COC) can be issued to verify the inter-changeability across all items.
- Why are some stainless steel HeliCoil inserts darker in shade than others?
HeliCoil inserts are derived from stainless steel raw materials, which may be darker or lighter in shade. Depending on the origin of these raw materials, HeliCoil inserts may take the colour as well.
- I noticed that some HeliCoil inserts are longer than others, even though they have the same nominal length. Correspondingly, the longer inserts have a wider gap between coils. Why is this so?
Being cold-rolled from stainless steel wires, HeliCoil inserts tend to have some spring-like properties, which may result in inserts being more “compressed” or “open”, thus appearing longer than others. This is not to be taken as the correct length of the insert, as the length is ultimately realized after the insert has been installed inside the threaded hole. A more accurate reading and verification of the length is to check the number of coils on the insert, which is given in our catalogue table.


10 Ubi Crescent #01-80 Lobby E, 408564, Singapore

(65) 6743 4155

(65) 6743 4155

sales@thorintl.com

Mon - Fri: 9am - 5pm
Sat - Sun: Closed


MRT
Take the appropriate MRT line to the nearest station, then continue your journey by bus, walking, or a taxi/ride-hailing service.


Bus
Check the bus services near the company’s location, board the relevant bus, alight at the nearest stop, and walk a short distance to the office.